In the next part of my Particle Photon course I want to connect the hardware we've built so far to a cloud service that can display things in a nice dashboard. The goal is to illustrate how you don't have to be a web developer to get your IoT project on the web and in a nice dashboard. Services like Ubidots and Losant provide frameworks for doing that. The reason I decided to give Losant a try was because it offers a built-in Particle integration so connecting my Photon-based project should be easy. Here are my first thoughts after spending two hours on the platform this morning. I had never used it before today.
The Basics
From the little time I've spent on the platform I've found it's important to know and understand the basic building blocks in Losant. This is how I understand them having read absolutely none of their documentation.
Application - This is the meat of your project. Think of it as a complete package of what you are trying to deliver. At first I made a 1:1 association with a hardware device but that isn't necessarily the case. It can be but think of something like a power plant that has multiple sensors and control devices. All of those could be wrapped into a single Plant Management Application. An application contains other basic building blocks like Devices, Workflows, and Integrations.
Dashboard - A dashboard is a completely configurable view comprised of "Blocks". Blocks can be simple Device output views or complex aggregations like a GPS heat map. You can bring in any information across all of your Applications that you want to see in a single view.
Device - A device is a building block that can be added to an application to retrieve data or send commands to. A device is not limited to one application so you could have a device that is part of multiple applications. There are multiple device types but I only explored the "Standalone" type as that's the category my Particle Photon falls into. A device can have several attributes which can be used in dashboard displays as well as workflows.
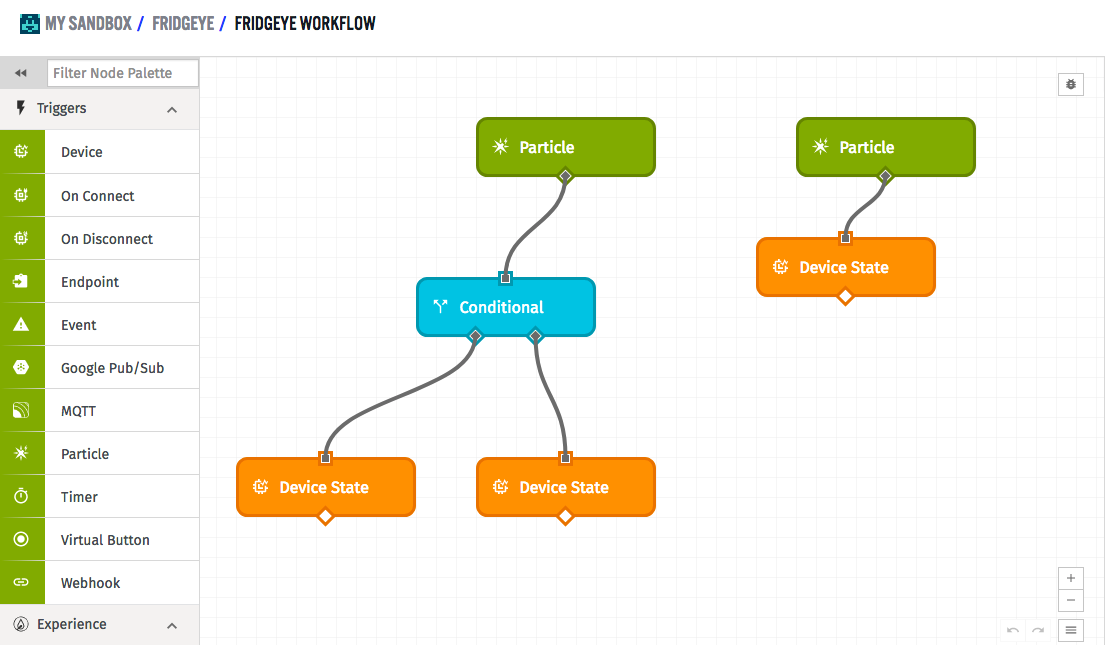
Workflow - A workflow is exactly what it sounds like. It is a set of rules and decisions for processing data in your application and controlling outputs. The workflow design surface has a flow-based editing view like Node Red. You grab building blocks from the toolbar on the left and drop them on the surface and connect them together to create work flows for your application. Here's what my finished workflow looked like to get temperature data from the Fridgeye as well as set a Device attribute of door-state to true or false.
Integration - An integration is a way to ingest information into Losant. It looks like it supports MQTT, Google Pub/Sub, and Particle. This is where I set up Losant to receive Particle Events from my device.
Example Flow
So putting that all together this is what the flow looks like. I set up a single Device to have two custom attributes of door-state and fridge-temp. Next, I created an Application named Fridgeye. Inside the Application I set up two Integrations for my Particle Events. I have a fridge-door-state and fridge-temp event that I publish to the Particle Cloud from my firmware. Each gets its own Integration. With those set up it's time to create a Workflow. The Workflow has to entry points which are the Integrations. The fridge-door-state goes through a conditional statement to see if the data passed in the event from the Photon is "open" or "closed". Based on the result of that conditional block the Workflow will set the custom door-state attribute on my Device to true or false. The other Integration takes the fridge-temp event directly from the Photon and sets the fridge-temp attribute on the Device with it's data. From there I created a Dashboard that has 3 Blocks. One for showing the temperature, one for a graph of the temperature and one that shows the state of the door and changes colors. Green for closed and orange for open. The end result looks like this.

The Good
It didn't take long to realize that Losant is an extremely mature platform with a ton of features. It has a lot of integrations to speed up prototyping and seems to hold true to the "Enterprise" in "Enterprise IoT Platform". The dashboard functionality is extremely configurable and has a lot of smart defaults to get you going. I'd love to give the heat map Block a try. Once I had a basic understanding of all the concepts and how they tied together it was pretty easy to move around and get things done.
The Bad
There is definitely a learning curve to getting started as it feels like there are so many things to set up and configure just to get going. The result, however, is an extremely power and configurable cloud platform. Even so I wouldn't be surprised if some people gave up and wrote the platform off as "too hard to understand and setup."
I did have some trouble with the Workflow editor not saving my work and showing me a message occasionally about how I was working on an "outdated version" even though I wasn't. I lost my entire workflow several times. The live stream of temperature was extremely responsive with sub-second response times from device to cloud display. On the other hand, the door state block on the dashboard would, at times, take up to a minute to update. Maybe I didn't have something configured correctly.
Summary
Overall I think it's pretty impressive that I was able to go from nothing to a working dashboard in two hours without reading any of the documentation. Despite there being a fair amount of basic knowledge required to get something working the UI was intuitive and leading enough to get me through, again, without reading the docs. Looking at the options I barely scratched the surface of what applications can do and didn't even touch the Events, Security, Experience, and Webhooks options. The substantial free tier allows anybody time to get their feet wet learning the platform and I'd recommend at least giving it a look if you want to add a web interface to your project but lack the web development background to roll your own.